How to Fix the upload_max_filesize Error in WordPress

The uploaded file exceeds the upload_max_filesize directive in php.ini. occurs when you try to upload files on your website that are larger than permitted from your server-side settings.
The file size limitations are often set by the administrators in order to maintain your website’s speed and responsiveness.
While it may sound quite frustrating initially, troubleshooting it is quite straightforward. The question is, how?
The quickest way to fix the uploaded file exceeds the upload_max_filesize directive in php.ini. error is by increasing your PHP resource limit set in the server-side settings.
Here’s how.
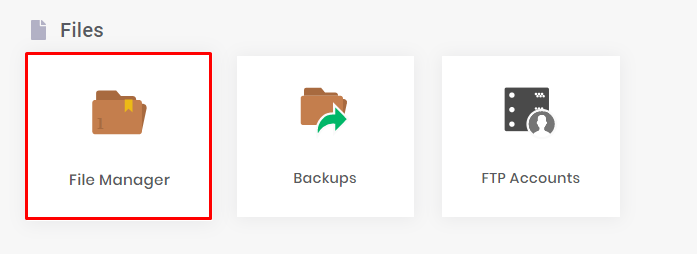
- Login to your hPanel and access the File Manager under the Files section.
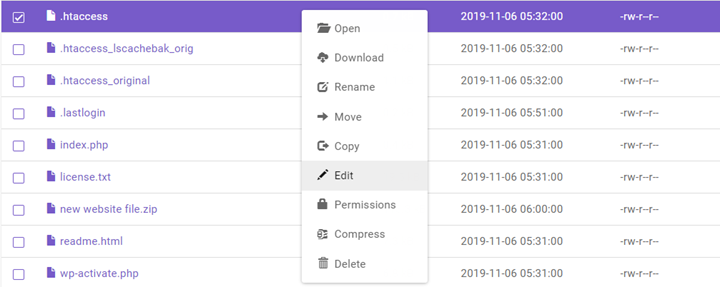
- In the File Manager, find .htaccess file and click on edit.
Now add the following line of code at the bottom of the file.
php_value upload_max_filesize 256M
Click on the Save changes.
Note that you can adjust the values and set the PHP upload limit depending upon your needs and support from the hosting providers.
While this was the quickest fix for the uploaded file that exceeds the upload_max_filesize directive in php.ini., there are 3 other effective methods to fix it as well. Let’s talk about them.
Methods To Troubleshoot The Uploaded File Exceeds The Upload_Max_Filesize Directive In Php.Ini.
Method 1. Edit The wp-config.php File
Another great way to troubleshoot upload_max_filesize directive in php.ini error is to edit your wp-config.php file in the root directory of your website.
Here’s what you need to do here.
- Access your hPanel and find the wp-config.php file in the public_html.
- Now add the following line of code in the file before ‘That’s all, stop editing! Happy publishing’.
@ini_set(‘upload_max_size’ , ‘256M’ );
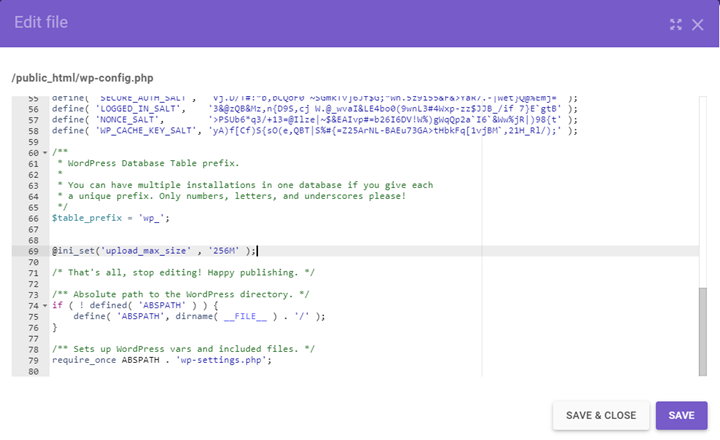
Now click on the Save button.
Method 2. Update php.ini to Fix the upload_max_filesize Error
Updating your php.ini file could also help you get rid of the uploaded file exceeds the upload_max_filesize directive in php.ini. Here’s how.
- Locate the php.ini file in your hPanel to edit it.
- Look for the upload_max_filesize and increase their value. Here’s how it looks like.
upload_max_filesize = 256M
Here you can also change the values for other limitations. For example
- post_max_size = 256M
- memory_limit = 512M
- max_execution_time = 180
- Now Save the file and the error will be gone.
Method 3. Make Changes to PHP Configurations on hPanel
The 3rd method for resolving the the uploaded file exceeds the upload_max_filesize directive in php.ini is making changes to your PHP configurations.
Here’s what you need to do.
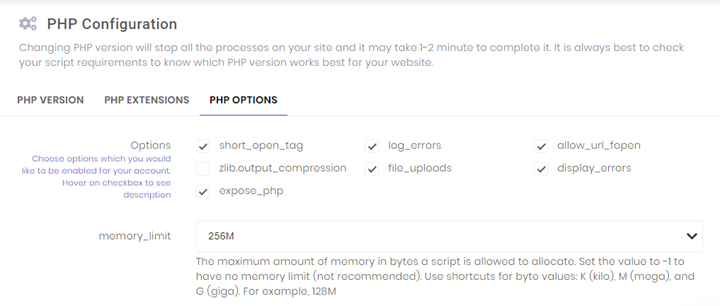
- Login to your hPanel and navigate to the PHP Configuration under Advanced menu.
- Now click on the PHP Options tab and navigate to upload_max_file to make changes.
WP-Pals Is Your Go-To Website Maintenance Company
While these errors can be troubleshot without much hassle, they can become a headache for beginners. Moreover, these errors may become reasons for your overall website reputation because they cast out your website as a non-credible source for your audience.
Your best pick is to go for a website maintenance company that can handle all the hassle related to your website while you can focus on other areas of your business.
Also, if you found this post useful, read our other guides on WordPress errors such as the ‘Fixing The 405 Method Not Allowed Error on Your WordPress Site’ and ‘Understanding & Preventing The ‘Briefly Unavailable for Scheduled Maintenance. Check Back in a Minute’ Error’ to raise your knowledge on the subject.