Creating A Dropdown Menu in WordPress (4 Steps Beginners Guide)

Do you have multiple items on your WordPress menu? Are you facing a limited space issue? Here’s a quick solution, Create a WordPress dropdown menu. A WordPress dropdown menu helps you solve the limited space issue by showing you the menu links only when you hover your mouse over them. This is quite a convenient option as it allows you to arrange your menus and add sub-menus within them as per your will.
Check out WP-Pal’s dropdown menu for a quick reference.

Further, in this blog, we’ll explain how to create a dropdown menu in WordPress with 4 simple steps, but before that, here’s why you need to use dropdown menus in WordPress.
Why Create Dropdown list In WordPress Page?
Thanks to its ease of access, WordPress allows you to add navigation menus on your website pages easily. This is perfect for smaller websites with fewer pages, such as blogs, because a single row is enough for all menus. However, an enterprise-level website or an eCommerce store has multiple sub-menus and categories for which you need to create more menu links. Creating WordPress dropdown lists comes in handy as they look more organized and make navigation much easier and non-cluttered.
Now that you know why it is good to create dropdown lists in WordPress let’s talk about how you can create them.
Let’s begin.
How To Create Dropdown Menu In WordPress? (4 Simple Steps)
Step 1. Choose A WordPress Theme With Dropdown Menu Support
Even though WordPress comes with the menu management options right of the box, this isn’t quite fruitful because of how good or bad those menus look entirely on your website’s theme.
Even though all WordPress themes come with out-of-the-box support for the WordPress dropdown menu, some themes do not fully support it. So, the first step is to choose a WordPress theme that comes with 100% support for dropdown menu customization.
Check out our blog on 10 Best Elementor Themes and Templates (Paid And Free) to choose a stunning-looking theme for your WordPress site.
So, how would you determine whether or not a theme supports dropdown menus? It’s simple. Before you download or purchase a theme, click on the DEMO button and see if the demo version shows a dropdown menu or not. If it doesn’t, then you need to look for another theme. Here’s a list of some themes that you can choose.
Related: Beaver Builder vs. Divi: The 110% Side-By-Side Comparison
Step 2. Create A Navigation Menu
The second step is to create a navigation menu on your WordPress site. If you already have one, then you skip stepping 3. If not, then here’s how you can create one.
- Go to the Appearance tab in the website’s dashboard and click on the Here you’ll find Create a new menu option.
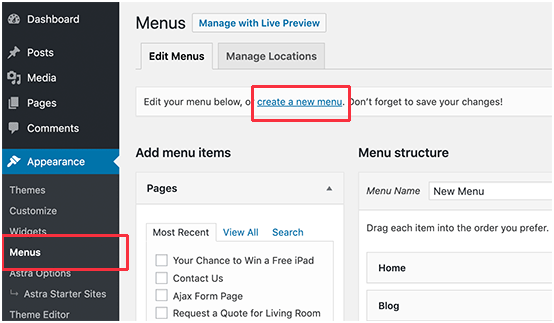
- Now give a name to your menu. Note that this name is just your reference, and it wouldn’t be publicly visible.

- Now click on the Create Menu button to create an empty menu.
- Once you’ve created an empty menu, you can add Top Links in the navigation menu, appearing at the top row in your menu.
- You can select the pages in the left column, i.e., categories, blog posts, custom links, etc.
You can see the pages selected from the left column in your newly created menu.
Step 3. Add Sub-Menus To The Menu
These are the menus that appear with the dropdown menu. Note that you can add sub-menus under any menu at your convenience.
- Select the desired items from the left column and click on Add To Menu
- Now drag the item and drop it under your desired parent menu. Move it slightly towards the right to make it a sub-menu.
- Now repeat the same process for every item that you want to make a sub-menu.
- Click on the Save Menu button to save changes.
Step 4. Publish Your WordPress Dropdown Menu.
The final step is to publish your newly created WordPress dropdown menu. If you’ve already had a menu that you were editing, you can see the changes right away. However, if you’ve created a dropdown list from scratch, you need to select a location where you want it to appear.
Note that each WordPress theme has its own predefined menu display locations.
To select the display location
- Go to the Menu Settings and navigate to Display Location.
- Select where you want to display your dropdown menu.
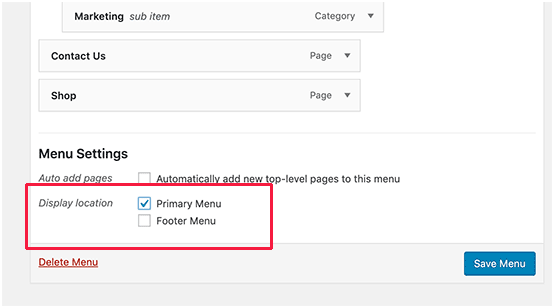
Now refresh your website, and you can see the changes.
There you go. Now you know how to create a WordPress dropdown menu. Following these steps, you can easily create a stunning dropdown list.
Creating Interactive Dropdown Menus
Let’s talk about some tips that may come in handy if you want your navigation bar to be more interactive.
Multi-Level Dropdown Menus
Did you know that you can even create a sub-item within a sub-item? Well, it is possible and quite simple to achieve by following the same pattern mentioned above.
Multiple Dropdown Menus
You can’t just create a single interactive dropdown menu but multiple dropdowns in a single navigation bar.
Creating Menus With Live Preview
You can even create dropdown menus with live previews to simplify it further. Here’s how
- Go to the Appearance and click on the customizer to open the theme customizer.
- Click on the Menus tab and select a navigation menu where you want a live preview.
- Now drag and drop the menu from the left column with the live preview of your site on the right.
Create A Large Mega Menu As A WordPress Dropdown Menu
Typically, a WordPress dropdown list would only show one column of menus at a time. However, you can still create a mega menu that appears within a single dropdown. You can use this option to show the entire structure of your site to the public.
Conclusion
Having a well-organized and good-looking navigational menu is quite important for the overall navigation and, most importantly, for the User Experience. If you’ve found this article useful, you can have a good look at subject like Increasing The Maximum File Upload Size In WordPress and Fixing The WordPress Err_Too_Many_Redirects Error to raise your knowledge.10100