Increasing The Maximum File Upload Size In WordPress With 3 Easy Methods

Is your WordPress site preventing you from uploading larger files? Do you want to increase the max WordPress upload size? Well, here’s your way to go. In this piece, we’ll explain how to change the Maximum upload size in WordPress, so let’s dive into that.
Related: Fixing The” Sorry, This File Type Is Not Permitted for Security Reasons” Error in WordPress
Fixing The WordPress Err_Too_Many_Redirects Error In 2 Minutes
At times, WordPress would keep you from uploading larger files due to the WordPress max upload size allowed. This normally happens with the media files, plugins, or WordPress themes.
Before you can fix this issue and increase WordPress upload size, you must first figure out the max file upload size in WordPress.
Here’s how you can do it.
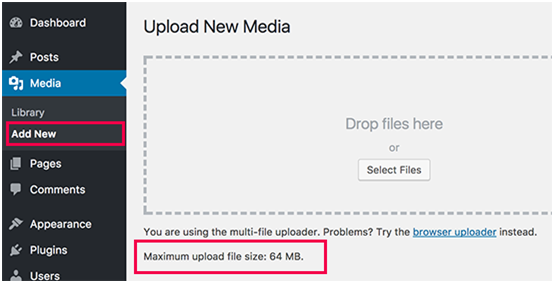
How To Find The Maximum File Upload Size Limit In WordPress?
- Go to the Media section in your WordPress dashboard and click on Add New.
- Below the Upload Media section, you can see the max file upload size limit of your WordPress site.
Now that you know how to find WordPress’s max upload size limit, let’s change the maximum upload size in WordPress.
How To Change Maximum Upload Size in WordPress? (3 Easy Methods)
- Using The Theme Functions File
- Using PHP.INI File
- Using The .htaccess Method
1. Using The Theme Functions File
Using the Theme functions file is perhaps the most straightforward way to increase WordPress upload size. All you have to do here is add the following code lines in your WordPress theme’s functions.php file.
- @ini_set( ‘upload_max_size’ , ’64M’ );
- @ini_set( ‘post_max_size’, ’64M’);
- @ini_set( ‘max_execution_time’, ‘300’ );
2. Using PHP.INI File
Now you need to access your site’s root folder to perform this method. You can do this using your FTP (Files Transfer protocol). You can also leverage your Files manager in the cPanel dashboard.
Suppose you’re sharing a hosting. In that case, you need to create a file named php.ini and upload it to your site’s root folder. Now add the following lines of code to this file.
- upload_max_filesize = 64M
- post_max_size = 64M
- max_execution_time = 300
Note that you can also use 10 MB instead of 64 if it doesn’t work initially.
3. Using The .htaccess Method
Using the .htaccess method is another great practice to increase max upload size in WordPress. All you need to do here is to make some minor changes into your .htaccess file. Add following lines of code in your .htacess file
- php_value upload_max_filesize 64M
- php_value post_max_size 64M
- php_value max_execution_time 300
- php_value max_input_time 300
Even though this method would increase max upload size in your WordPress site, but if you’re using shared hosting, you’d need to contact your service provider to change the upload file size limit for you.
Conclusion
There you go. Using these 3 easy methods, you can increase the maximum file upload size in WordPress without any hassle. Also, if you find this article useful, read our other troubleshooting guides on subjects like “Understanding & Preventing The ‘Briefly Unavailable for Scheduled Maintenance. Check Back in a Minute’ Error” to raise your knowledge.