
How To Edit Your Footer In WordPress With 4 Easy Methods

While it is often overlooked, learning how to edit the footer in WordPress is quite important alongside other customization practices such as changing WordPress fonts. There are some good reasons for that, with WordPress SEO being the most important one.
In this article, we’ve put together a rundown of 4 easy methods that you can use to edit your footer in WordPress easily.
Let’s begin.
Related: The 15 Website Headers That Will Inspire You Within Minutes
So, What Is The Footer In WordPress?
You can refer to ‘footer’ as part of your website page that appears below the page’s main content. In simpler words, it appears at the bottom of every page on your WordPress site.WordPress footer looks quite similar to your WordPress site’s header with all the key elements such as your site’s logo, Contact details, CTAs (Call To Action), etc.

Why Change Footer In WordPress?
Here are some reasons why you should change the WordPress footer.
- Changing the footer colors as per your brand tone and colors and adding up your logo in the footer is highly positive for your branding efforts.
- You can add a mega menu in the WordPress footer so that the navigation gets easier for the audience.
- You can quickly boost your cross-channel connections by embedding your social media links in the footer.
Now that you have a fair understanding of what is WordPress footer and how it can help you maximize your engagement let’s talk about how to edit a footer in WordPress.
How To Edit Your WordPress Footer With 4 Easy Methods
In general, there are multiple ways of changing your WordPress footer depending upon the type of changes you want and your expertise. But since more people use WordPress due to its ease of access, here are 4 simple methods of editing the footer in WordPress.
- Changing Footer Through Theme Customizer
- Using Footer Widgets
- Editing Footer Using A Plugin
- Editing WordPress Footer Manually
1. Changing Footer Through Theme Customizer
The first and most convenient method of changing the footer in WordPress is by using the WordPress Theme customizer. This method won’t require you to get your hands dirty with any code or plugins.
You just need to get your WordPress Dashboard and locate Customize option in the Appearance tab.
Now that you’re in the Customizer tab, you can navigate the Footer section and make the desired changes like footer layout, content, colors, etc.
It is worth noting that it highly depends upon the theme whether or not it provides you the customization option. Regardless, most of the themes offer this option.
Moreover, you can always view the changes in real-time before you can implement them.
Now let’s move down to the second method of editing the footer in WordPress – Using Footer Widgets.
2. Using Footer Widgets
Suppose if your theme doesn’t provide you with a customization option, you can use the Footer Widgets to edit your WordPress footer.
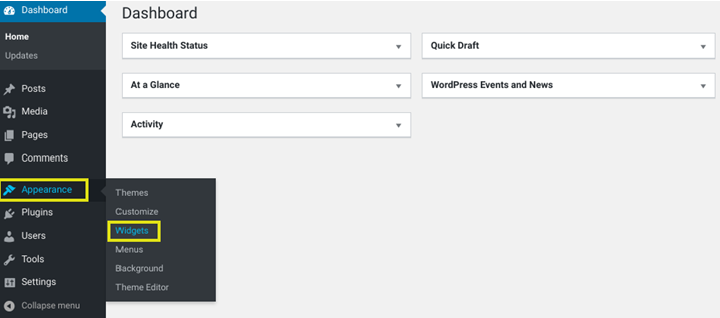
To do this, go to the Appearance tab and click on the Widgets option.
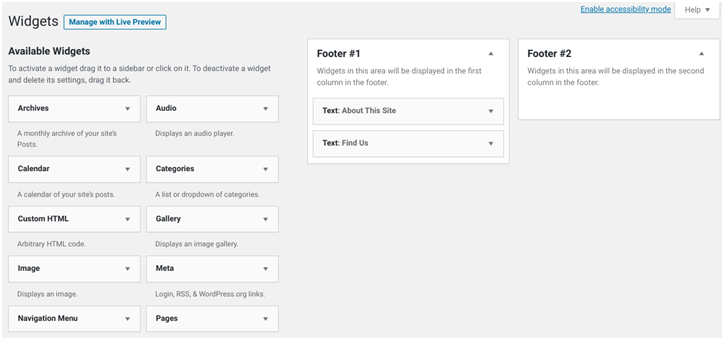
Typically, all the available widgets appear on the left side of the page, but this may vary depending upon the theme you’re using. If you’re using a default WordPress theme, you’ll get two-footer widgets available on the right side of the page.
To edit the footer content, you need to expand the field by clicking on the widget’s arrow beside Text. Note that you can make changes in the widgets by either using a text editor or visual editor.
You can also add up more widgets by dragging them from the left side to the relevant section.
Once you have made the changes, you can click on the Save button to implement changes.
3. Editing Footer Using A Plugin
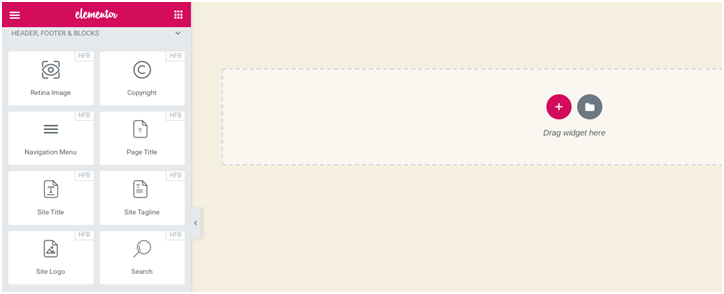
Installing and using a WordPress footer plugin is perhaps the most accessible way of editing your footer in WordPress. WordPress boasts over its large variety of plugins; therefore, you can find multiple plugins depending upon the changes you need. One great example of a WordPress footer plugin could be the Elementor
Image source:WPKIK
Now, this plugin is a free ad-on that supports a drag and drop approach for making changes. All you need to is drag the desired elements and drop them in the relevant footer areas. Moreover, it also allows you to expand your footer section.
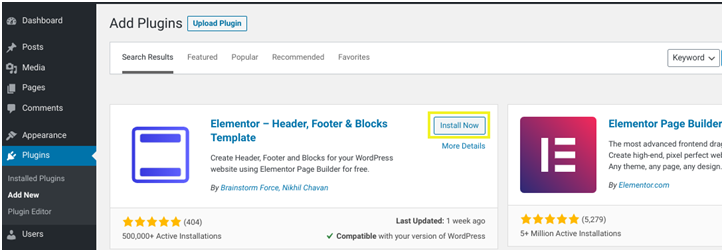
To install the Elementor plugin, go to the dashboard and access the Plugin tab. Now click on the Add New option and search for the Elementor footer. Now you can install and activate the plugin to edit your WordPress footer.
After activating the plugin, go to the Appearance tab and click on Header Footer and Blocks option.
There are several customization options that Elementor has to offer. Just click on the blue Edit with Elementoroption and start dragging and dropping the footer widgets into your desired section.\
Once you’ve made the changes in the WordPress footer, you can click on the Save button.
4. Editing WordPress Footer Manually
Editing WordPress manually would require you to make some changes in the footer.php file. You can find this file in the theme folder of your WordPress.
Follow these steps to edit the footer in WordPress manually.
- The first step is to download the /wp-content/themes/yourtheme/footer.php file.
- Go to the text editor and find the line “Powered By WordPress” to edit it.
Here’s how it looks in the default WordPress theme.