Fixing The DNS PROBE FINISHED NXDOMAIN Error On Chrome, Windows, Android,& Mac

Have you ever visited a website and run into the dns probe finished nxdomain error? Well, I’m sure you were annoyed by the error because who wouldn’t be? The error can appear on your website or a client’s website. If you don’t know how to fix it, don’t worry; I got you covered.
The DNS_PROBE_FINISHED_NXDOMAIN message is basically an error code trying to tell you that the DNS has failed to lookup IP address while trying to open a website. It is a very common Google error that Windows, Android, and Mac smartphone users face too.
Now the quickest way to troubleshoot DNS_PROBE_FINISHED_NXDOMAIN is by disabling your browser’s VPN and antivirus. If the error still persists, then there are other ways to fix it – which we’ll discuss in this read.
Let’s begin with a brief overview of what DNS_PROBE_FINISHED_NXDOMAIN is.
Related: How to Quickly Fix Error 1020: Access Denied
What Is The DNS_PROBE_FINISHED_NXDOMAIN Error?
To understand what the error means, let’s break it down to make it easier to grasp the concept of this message.
The “DNS” part stands for Domain Name System, responsible for translating user-readable domain names to machine-readable IP addresses. When you visit a website, for example,www.wppals.com, you understand that website address; however, the machine you’re using understands a different term which usually looks like “192.434.55.” What you remember in words, the machine remembers in numbers.
The DNS is the computer’s phone book. When you enter a website address, the webserver receives the requests and searches for the IP address. It then redirects you to the website based on the domain name.
If the connection fails due to any reason, you end up receiving the DNS error page. The page usually looks like this and has a message like “This site can’t be reached” or “This site is unavailable”:

The message is an indication that the webserver failed to locate the IP address of the domain name you’ve entered, which is a hindrance, to say the least.
The last part of the error message “NXDOMAIN” is short of a non-existent domain. And yes, it’s common for the error to occur even if you have the right domain name.
Related: 7 Major Reasons That Websites Crash & What Can You Do To Prevent Them?
Related: WordPress White Screen of Death – What It Is And How to Fix It (In 10 Steps)
Why Did The DNS_PROBE_FINISHED_NXDOMAIN Error Occur?
Chrome and WordPress users often face a variety of error messages which are nothing less than annoying. And if you see the DNS error, it means the DNS name resolution failed to complete properly.
Like I said, the DNS_PROBE_FINISHED_NXDOMAIN means your web server failed to locate the IP address of the given domain name. However, the error (always) doesn’t mean the website no longer exists; it’s an indication that some backend issue is preventing the DNS from translating the domain name into an IP address.
Related: Fixing The WordPress Err_Too_Many_Redirects Error In 2 Minutes
Related: How to Fix the upload_max_filesize Error in WordPress
Here are some reasons why the error is showing on your screen:
- You misspelled the domain name.
- Your browser is outdated.
- Your device’s internet connection isn’t working.
- A third-party tool is creating a conflict.
- A VPN installed on your computer is limiting your access.
- Your DNS settings are outdated or misconfigured.
There’s no need to be alarmed; in the next part, I’ll show you how to fix the pesky error platform-wise.
Related: How To Fix 405 Method Not Allowed Error
Fixing The DNS_PROBE_FINISHED_NXDOMAIN Error On Windows 10
If you’re facing the error on Windows 10, don’t fret, there are five different solutions you can apply to get rid of the dns probe finished nxdomain error.
- Clear Out Your DNS Cache On Windows 10
- Reset Your IP Address On Windows 10
- Switch Your DNS Server On Windows 10
- Restart Your DNS Client Service On Windows 10
- Check Your Local ‘Hosts’ File On Windows 10
Clear Out Your DNS Cache On Windows 10
To flush or clear out your DNS cache, here’s what you have to do.
- Go to the start menu.
- Type “cmd” and click “Run as administrator in the right panel.”
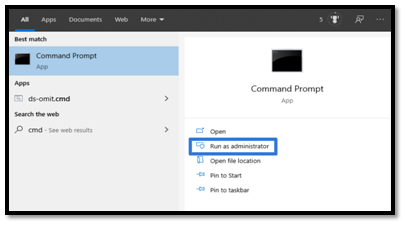
- If it asks your permission to make changes to your device, press “Yes.”
- When the Command Prompt window opens and loads, enter the following text:
- ipconfig/flushdns
- Press “Enter,” and you should see a message that says,”The DNS cache was successfully cleared.”
- Restart your browser.
Reset Your IP Address On Windows 10
Here you’ll be resetting your IP address and releasing a new one. Here’s how to do that:
- Open the “Command Prompt” window and enter the following commands. Remember to press enter after each command.
- ipconfig/release
- ipconfig/all
- ipconfig/renew
- netsh int ip set dns
- netshwinsock reset
This should release and renew the IP address and reset your Winsock on Windows 10. Once the commands have been entered, restart your device and revisit your browser.
Switch Your DNS Server On Windows 10
To switch to a different DNS server on Windows 10, here’s what you need to do:
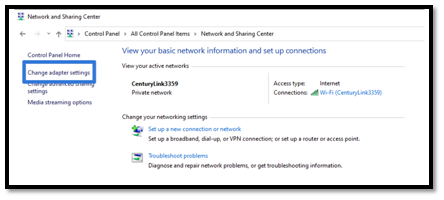
- Go to the start menu and type “Control Panel.”
- Click the “Control Panel and navigate to “Network and Sharing Center.”
- Find and click “Change adapter settings” in the left panel.
- Right-click your Wi-Fi connection and select “Properties.”

- Once the window opens, select Internet Protocol Version 4 (TCP/IPv4), and click on “Properties.”

- Go to the “General” tab and click “Use the following DNS server addresses.”
- Now, enter these values in the respected fields:
- Preferred DNS server: 8.8.8.8
- Alternative DNS Server: 8.8.4.4

- Select “OK” and restart your browser.
Restart Your DNS Client Service On Windows 10
Sometimes (if you’re lucky enough), restarting your DNS client can resolve the DNS_PROBE_FINISHED_NXDOMAIN error. Here’s what you can try:
Press the Windows key and “R” key on your keyboard simultaneously to open the “Run” command box.
- Type “services.msc”and press the OK button.

- When the window opens, find “DNS Client” under the “Name” category.
- Right-click and press “Restart.”

This should fix the error; however, if the DNS client is grey in color, it means it’s disabled. Don’t worry, here’s the alternative method you can use.
Open the Command Prompt window (like I showed in the first method) and enter the following commands.
- net stop dnscache
- net start dnscache
(Make sure to press enter after each command.)
Check Your Local ‘Hosts’ File On Windows 10
Make sure your host file doesn’t contain the website you’re trying to access. Here’s how you can do that:
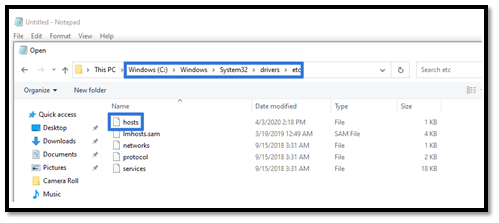
- Open the start menu and enter “Notepad.”
- Click “Run as administrator.”
- When the editor opens, enter the command: “C:\Windows\System32\drivers\etc\”
- In the window, open the “hosts” file.
- Now, check the “hosts” file to make sure it does not have the website listed that you’re trying to access.
- If the name is present, delete it, and save the file.
- Restart your browser.
Fixing The DNS_PROBE_FINISHED_NXDOMAIN Error On Mac
The DNS solutions of Windows are very similar to Mac; however, the steps are a little different because they’re different operating systems.
- Clear The DNS Cache On Mac
- Reset The IP Address On Mac
- Switch To Other DNS Server On Mac
- Check Your Local ‘Hosts’ File On Mac
Clear The DNS Cache On Mac
The first trick is to clear out the cache, and here’s how you can do that:
- Go to the Applications and click Utilities Folder.

- Double-click the Terminal heading, and when the app opens, enter dscacheutil -flushcache.
- Now press Return and try restarting your browser. The error should be eliminated.
Reset The IP Address On Mac
Now, you can try resetting your IP address to release a new one. Here’s how:
- Open the Terminal app on your Mac device and enter: sudokillall –HUP mDNSResponder
- Press Return and enter a password if required. Restart your browser.
Switch To Other DNS Server On Mac
Like a Windows device, you can change your DNS server from the assigned one. Here’s how you can do this on a Mac device:
- Click on the Apple logo.
- Click System Preferences and then click Network.

- Select your current network connection and click on the Advanced button.
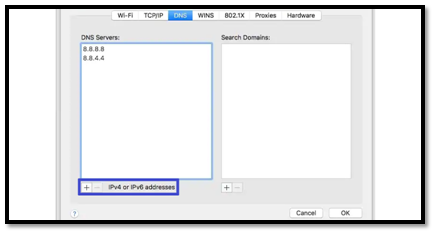
- Under the DNS tab, click the (+) icon next to IPv4 or IPv6 addresses.
- Next, enter the following:
- 8.8.8.8
- 8.8.4.4
- Restart your browser, and the error should be removed.
Check Your Local ‘Hosts’ File On Mac
To check your “hosts” file on a Mac device,here’s what you need to do. Once you remove the website URL from the “hosts” file, you’ll be able to access the website. Here’s how to locate the “hosts” file and delete the website:
- Open the Terminal application.
- Enter the command: sudo nano /private/etc/hosts and press Return.
If you’re asked for a password, enter it and continue. Once the file opens, locate the website you’re trying to access and delete the line from the file, save, and exit.
Now, refresh your browser and try accessing the website again.
Fixing The DNS_PROBE_FINISHED_NXDOMAIN Error On Chrome
If you’re using Chrome and need to fix the dns_probe_finished_nxdomain error, then here are ten ways you can use it.
- Re-check The URL You EnteredOn Chrome
- Restart Your DeviceOn Chrome
- Reset All Chrome FlagsOn Chrome
- Temporarily Switch Off TheAntivirus Software Or VPN On Chrome
- Delete All Chrome Browser CacheOn Chrome
- Delete All Local DNS CacheOn Chrome
- Reset The IP Address On Chrome
- Switch To Other DNS Servers On Chrome
- Restart the DNS Client service on Chrome
- Check Your Local ‘Hosts’ FileOn Chrome
Re-check The URL You Entered On Chrome
The most basic reason you see the dns_probe_finished_nxdomain error could be because you entered the wrong URL – it’s an honest mistake. Simply double-check the URL you entered in the browser and try entering it again.
In case the URL is right, you can try a different method.

Restart Your Device Running Chrome
Another basic method is to restart your laptop or desktop PC. If you’re using a handheld device like a tablet or a smartphone, simply turn off the device and turn it back on again.
Restarting your device may seem like an annoying solution, so keep it as the last method you try.
Reset All Chrome Flags On Chrome
Installing and adding new extensions to your Chrome can sometimes hinder the browser’s settings. It can also interfere with your DNS settings which can be the reason you see the dns_probe_finished_nxdomain error.
To remove the error, it’s a good idea to reset your Chrome settings back to default settings. Here’s how to reset your settings:
- Go to your browser text field (where you put the URL.)
- Enter: chrome://flags
- On the “Experiments” page, hit the Reset All button.
- Restart Chrome and try accessing the website again.

Temporarily Switch Off The Antivirus Software Or VPN On Chrome
As we’ve mentioned it earlier, Your antivirus software and VPNs can also play a role in showing the dns_probe_finished_nxdomain error and affect the DNS server settings. Therefore, you need to disable them and see if the error’s gone or not.
The easiest way to disable the software or VPN is this:
- Go to your control panel.
- Locate the “Programs” button.
- Find the antivirus software or VPN.
- Right-click on the program and click “Disable” or “Uninstall.”
- Return to your browser and try again.
Delete All Chrome Browser Cache On Chrome
Another way you can rid yourself of the dns_probe_finished_nxdomain error is by flushing your Chrome cache.
It might sound complicated, but flushing your cache on Chrome is easy. Here’s how:
- In your Chrome browser, go to the right side and click the
button.
- Select More Tools and then click Clear browsing data.

- Once the window opens, click the Advanced tab.
- Make sure the Cookies and other site data and Cached images and files are ticked.

- Now click Clear data and restart your browser, then try to access the website again.
Delete All Local DNS Cache On Chrome
If clearing the Chrome cache didn’t work, then maybe this will work for you. You can try clearing the DNS cache to remove the dns_probe_finished_nxdomain error. Clearing the DNS cache will clear out all the previously stored IP addresses of the websites you have visited.
You can flush the DNS cache for Mac and Windows as explained under those headings.
Reset Your IP Address On Chrome
Resetting your IP address and releasing new ones can also fix the DNS error; the methods above have failed until now. You can easily renew your IP address which is much like clearing the DNS cache.
Refer to the Mac or Windows IP resetting headings if you’re using either of the platforms. You’ll need to run commands, and everything is described properly under those headings.
Switch To Other DNS Servers On Chrome
Depending on your Internet Service Provider (ISP), your DNS server is assigned automatically. That’s all well and good; however, to fix the dns_probe_finished_nxdomain error, you can temporarily switch to the Google public DNS.
To apply this method, refer to the heading of the operating system you’re using.
Restart the DNS Client Service On Chrome
The DNS server and Window devices are interlinked to resolve domain names and fix the dns_probe_finished_nxdomain error, and you might need to restart your DNS client service.
Keep reading further to find out how you can restart your DNS client.
Check Your Local ‘Hosts’ File On Chrome
If you’re reading this, it means all the above methods didn’t work in resolving the dns_probe_finished_nxdomain error, and it’s okay. The last trick is to check the local “hosts” file and make sure the website isn’t listed there.
Although unlikely but not impossible, somehow, the “hosts” file was altered, and you’ll have to search for the website you’re trying to access manually. Should you find the website listed in the “hosts” file, delete the website and save the file. To do this, refer to the heading platform-wise, depending on which operating system you’re using.
Fixing The DNS_PROBE_FINISHED_NXDOMAIN Error On Android
All the solutions I’ve mentioned were for desktop PCs or laptops. In this part, I’ll be offering solutions for Android because it’s possible to face dns_probe_finished_nxdomain on an Android phone.
Here are some solutions you can use to remove the dns_probe_finished_nxdomain on Android.
- Check For Updates On Your Android System &Chrome App
- Clear The Cache Of Chrome Browser and App Data
- Switch To Different Android Network Settings
Check For Updates On Your Android System & Chrome App
If restarting the device didn’t work, then an outdated operating system or chrome app might be the reason you’re facing the dns_probe_finished_nxdomain error.
- To check for system updates, here’s what you do:
- Go to Settings and locate System Update.
- Click the button and update your system (if there’s an update available).

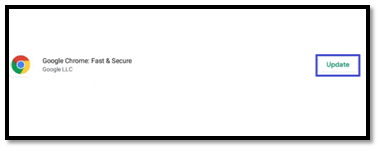
To check updates for Chrome, follow this:
- Open the Play Store.
- In the left menu, click My Apps and click GoogleChrome.
- Select Update if the button is available to update the app to the latest version.
- Restart your device, and try visiting the website again.
Clear The Cache Of Chrome Browser and App Data
If you try clearing the cache and data for Chrome, it might help you eliminate the dns_probe_finished_nxdomain error.
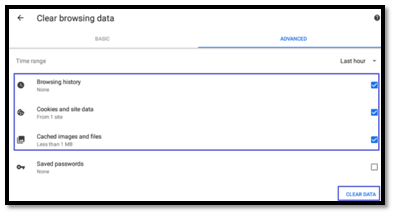
- Go to the Chrome browser on your smartphone.
- Click the three dots in the top right.
- Go to Settings > Privacy > Advanced > Clear Browsing Data.
- Click Browsing History, Cookies And Site Data, and Cached Images and Files.
- Click Clear Data.
To clear the app data, here’s what you need to do:
- Go to the Settings on your Android phone.
- Click Storage >Apps> Google Chrome.
- Select Free Up Space.
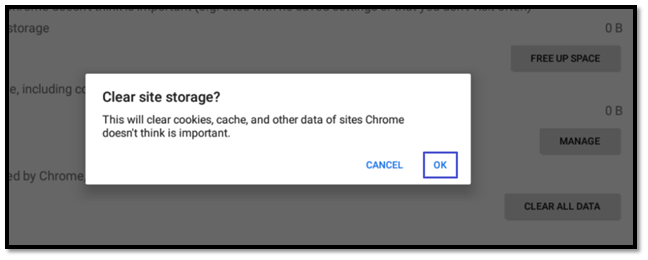
- Next, press OK if you’re prompted.
This method should help you delete all the unnecessary data on your phone’s Chrome browser.
Switch To Different Android Network Settings
You can also try changing your network settings on Android to eliminate the dns_probe_finished_nxdomain error. Here’s how:
- Go to Settings > Network & Internet.
- Long press the internet connection you’re currently using.
- Click Modify Network in the drop-down list that appears.
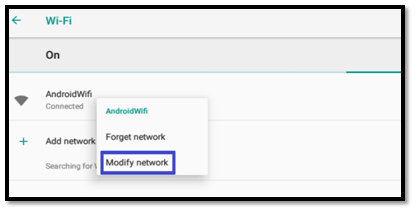
- Under Advanced options, select Static andscroll down to DNS 1 and DNS 2.
- Enter the values as shown in the screenshot:
- 8.8.8.8
- 8.8.4.4

- Save your changes, and you’re done.
- Go back to your browser, and try accessing the website again.
In Conclusion
A dns_probe_finished_nxdomain error is irritating and concerning because you’re worried if your website has hit a permanent bump; however, it’s not the end of the world.
There are numerous ways you can try to eliminate the errors, most of which are quite easy to do. The most effective solutions that I’ve found to get rid of the error are:
- Restarting your device.
- Try flushing your DNS cache.
- Resetting your IP address.
- Changing your DNS server.
- Restarting your DNS server client.
- Checking and altering your “hosts” file.
I’d suggest trying one of these methods before you try any other trick, and it should work. Another great strategy is to hire a WordPress service maintenance provider like WP-Pals to do them for you.
Our WordPress experts are skilled, and they’ll make sure your website is always running smoothly.